Build a Home Lab Part 5 - HTTPS & Certificates
Learn how your data is protected while on its way to web servers
In the last home lab article you learned about webservers. Now we’re going to take it up a slight notch. Now we’ll learn how to encrypt our communications.
Why would we want to encrypt our communications with the webserver?
Because we don’t want our data stolen…duh!
Someone could steal our data if they were sniffing packets on our network. A worse situation is if they placed themselves in the path of our traffic and sat in the middle. While sitting in the middle they look at our traffic and pass it on. This is known as a Man-in-the-Middle (MitM) attack.
Many popular open source projects are web applications that will require you to set up web servers and TLS certificates. Knowing how to configure a web server to use TLS certificates is a useful skill for your home lab, SaaS applications and web apps that are used within your workplace.
Run a sudo apt update && sudo apt upgrade -y to make sure your machine is up to date and continue to the first step.
Prepping a Demo
We are going to start by showing how data looks before and after it is encrypted. We’ll do this through a basic exercise. We are going to compare the difference between an HTTP request and an HTTPS request.
An HTTP request is sent in plain text while an HTTPS request is encrypted.
Set up a Basic Login Page
We are going to use a basic login page to help with our demonstration.
Go to /var/www/html and create a new file called login.html. Use vim or your text editor of choice to create and open the file.
cd /var/www/html
sudo vim login.html
Then edit it to have the same HTML as below:
<h1>Login Page</h1>
<form action="" method="post">
  <div class="container">
      <label for="uname"><b>Username</b></label>
      <input type="text" placeholder="Enter Username" name="uname" required>
      <br>
      <label for="psw"><b>Password</b></label>
      <input type="password" placeholder="Enter Password" name="psw" required>
      <br>
      <button type="submit">Login</button>
  </div>
</form>
This HTML form takes a username and a password. When the submit (Login) button is hit, it will make a POST HTTP request to /login.html with a uname and psw variable. The uname variable will hold your username and the psw variable will hold your submitted password.
An HTTP request using the POST method sends data to a webserver with data stored in the request body. POST requests can not be cached and do not stay in the browser history.
Now open your browser and go to your login page. Mine is located at:
192.168.20.73/login.html
She isn’t pretty, but she’ll get the job done.
Listening In…
Run the below command in your terminal:
sudo tcpdump -nnSX port 80 > /tmp/results.pcapThis will run tcpdump. The tcpdump command is going to listen for traffic going over port 80 and put the captured information into a file called results.pcap. The results.pcap file will be stored in the /tmp folder.
Why listen over port 80? Because that’s the default port for HTTP!
Your terminal should now look like this:
Go back to your browser. Put in any username and password. Click ‘Login’. The page will reload and your text will disappear.
Return to your terminal and hit CTRL+C on your keyboard to cancel the tcpdump command. You’ll get a report saying how many packets were captured by the tcpdump filter.
Open your results capture file:
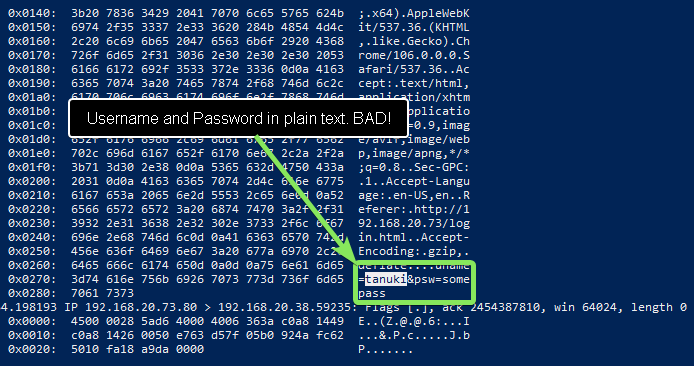
sudo vim /tmp/results.pcapThen search for the username that you used. I used the username ‘tanuki’.
And look what we found…our username. Right next to it? Our password in CLEAR TEXT.
Zoinks.
Encrypting Our Comms
Let’s encrypt our communications so our password isn’t sent in clear text anymore. Run the following commands in your terminal:
sudo a2enmod ssl
sudo a2ensite default-ssl.conf
sudo systemctl restart apache2
These commands will do the following in order:
Enable the Apache2 SSL module
Enable the default Apache2 SSL configuration
Restart apache to apply our changes
Let’s take a peek into the default-ssl.conf file to see what it is all about:
sudo vim /etc/apache2/sites-enabled/default-ssl.confI removed all of the comments in mine to make it easier to read. There’s a few things I want to point out here. Read the first line. It says <IfModule mod_ssl.c>. At the end of the file we see a closing tag.
IfModule mod_ssl.c is saying, “Hey, if the SSL module is enabled then continue on to the configuration between my tags.”
Moving forward we see a VirtualHost tag. This ends in 443. HTTPS runs on port 443 so it makes sense we’d have an Apache VirtualHost listening on port 443.
The last thing I want to point out is the three SSL settings. These are SSLEngine, SSLCertificateFile and SSLCertificateKeyFile.
The first one, SSLEngine, turns on the SSL/TLS Protocol engine. The SSLCertificateFile lists a file path to a public certificate and SSLCertificateKeyFile points to a private key file.
We’ll learn how the public certificate and private key come into play soon. First let’s finish our demo and see what happens when we use HTTPS.
Listening In…Again
Run the below command in your terminal:
sudo tcpdump -nnSX port 443 > /tmp/results_https.pcapThis time we are going to listen on port 443 and store the captured result into /tmp/results_https.pcap.
Return back to your browser and access your login page using HTTPS. For example, I will use https://192.168.20.73/login.html.
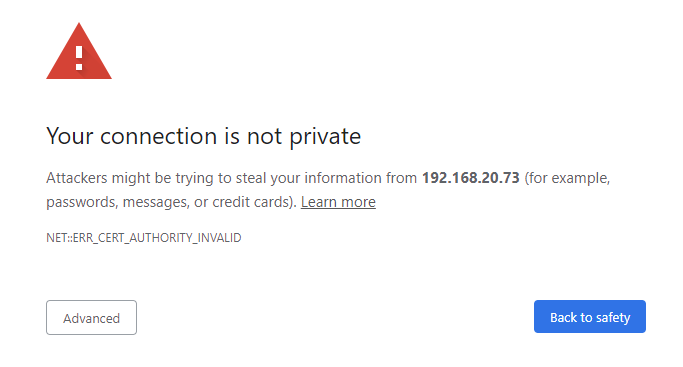
You will get a warning in your browser that looks like this:
Do not fret. This error comes because we are using the ssl-cert-snakeoil certificates that are generated when the ssl-cert package is installed on Ubuntu. This error is letting us know that the browser does not trust the certificate.
This is okay for our demo. We can ignore the warning. The data will still be encrypted. Click the ‘Advanced’ button and then the ‘Proceed’ link. This will look slightly different on other browsers.
You will now be back at your login page. Submit a random username and password like last time. Then hit the Login button.
Return your terminal and stop the packet capture using CTRL+C. Open the file /tmp/results_https.pcap. Try to find your username and password. You won’t be able to if you submitted the form over HTTPS.
Nothing useful to be found! Your data was encrypted. Only the server can decode the HTTP request.
So…What Happened?
How did your data get encrypted? What happened is the server and your browser used symmetric cryptography to encrypt communications. Before that though they used asymmetric cryptography to set everything up. Let me explain.
Your client (the browser) and your webserver took the following steps:
Your browser connects to the webserver. It tells the webserver what TLS version it supports and the cipher suites it can use. It also sends a string of random bytes called the “client random”.
The server responds with a message containing the server’s SSL certificate. This would be our ssl-cert-snakeoil.pem file. The server sends its chosen cipher suite and a string of bytes called the “server random” in its response message also.
The client will now verify the SSL certificate with the certificate authority that issued it. Your browser does not trust the certificate authority of our snake oil certificate. That’s why it throws a warning message.
The client then sends a random string of bytes called the premaster secret. The premaster secret is encrypted with the server’s public key. The public key is found inside the the certificate from the server (ssl-cert-snakeoil.pem).
The server decrypts the premaster secret using it’s private key. In our demo this was the ssl-cert-snakeoil.key file.
The client and server now generate session keys using the premaster secret, the client random and the server random. They will arrive at the same result.
The client will send a finished message to the server that is encrypted using this new session key.
The server will also send a finished message back that is encrypted with the session key.
The entire process is now finished. Communication continues using these session keys.
Pretty cool huh?
The browser and server use asymmetric cryptography, the use of public and private keys, to securely pass information needed for session keys. The session keys are then used for symmetric cryptography.
Symmetric cryptography is preferred for consistent communication because it is faster.
Wrapping Up
Good job making it to the end.
Now you have a solid grasp of webserver basics, how a TLS handshake works and can see the difference between HTTP and HTTPS.
With this info you can now set up open source web applications and encrypt their communications. All web applications will use a webserver like Apache or Nginx to serve their app.
As long as you have a certificate, documentation and some tenacity you can secure any web app.
I plan to have a more in-depth article on cryptography in the future.
Stay tuned.
Tanuki


