
Building a Home Lab Part 1 - Proxmox
Utilizing an open-source platform with enterprise virtualization capability

Getting our Starting Equipment
Welcome to the first part of building a home lab.
This mini series will show you how to create a useful home lab for personal use that costs less than $500. You can use this series to build a portfolio of projects that will help you get an entry level IT job. Make sure to do your own write-ups about what you learned if you do model your portfolio off of this series.
You can use a laptop as a server if you have one laying around, but I will be using a ThinkCentre M720q. This comes with an i5 processor, 8GB RAM, and a 256 GB SSD. You can pick them up on Ebay for ~$250.
Note: With 8GB of RAM you are not going to be able to run a ton of Virtual Machines. You’ll probably be able to run 3 VMs with 2GB of memory each. We need some left over to power ProxMox. Three to four VMs is enough to have a Proxmox + VPN + 2 services of your choosing. We’ll run through more than 4 services over the course of the lab so if you want to run everything then get something with some more juice.
You will need another machine to connect into your server. I’ll be using my desktop, but a used ThinkPad T480 from Ebay for ~$230 will do you just fine.
")
Today’s article will show you how to install the Proxmox Virtual Environment (PVE) on a machine. PVE is an open-source platform for enterprise virtualization. You’ll be using it to manage the virtual machines within your home lab. PVE is a type 1 hypervisor. What this means is Proxmox is used to virtualize guest operating systems and it runs directly on the host hardware.
This differs from a type II hypervisor. A type II hypervisor, like Oracle VirtualBox, runs as an application on top of an existing operating system. Type I hypervisors are the most commonly deployed type of hypervisor. They are more efficient than their type II counterparts.
The last item we will need is a USB to put the Proxmox ISO on. Any USB that is greater than 4 GB will be acceptable.
Downloading Proxmox VE
Visit the Proxmox Downloads page here while on a laptop or PC. I’ll be using the Proxmox VE 7.2 ISO Installer. Click on Download to begin. This may take awhile to download.

We will now use balenaEtcher to flash the ISO to our USB. Etcher is a free software that you can download from balena.io/etcher. Below is a screenshot of Etcher right before I started flashing to my USB.
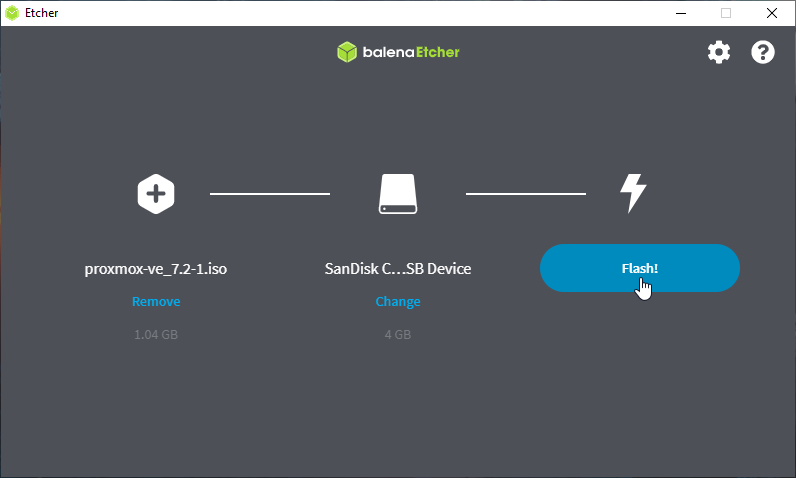
Click flash and wait 2-3 minutes for it to flash and validate. Deny any Windows prompts that ask if you want to format the drive. Remove the USB flash drive after Etcher finishes. Plug the USB into the M720q, laptop, or whatever device you are putting Proxmox on.
After plugging in the USB power on your device and access the boot menu. You can hit F12 for the M720q while its powering on to access its boot menu. Boot the device with the USB drive. You should be met with the Proxmox installer after a few moments.
Installing Proxmox VE
Note: At time of writing there is a known bug with ProxMox where it might not take an IP address during installation if using WiFi. Do the installation over a wire if possible.
The people over at Proxmox have made it incredibly easy to install the software. Follow along with the on-screen prompts and you’ll be fine. This installation WILL WIPE out everything on your machine’s disk and replace it with Proxmox. By now you should be looking at the Proxmox Welcome screen.

Hit the “Enter” key on your keyboard to start the installation. Your screen may go black for a brief moment and then you’ll land on the end user license agreement screen. Read the agreement if you enjoy that kind of torture. Otherwise, you can accept and proceed with the installation.
Next you’ll have to select the disk you want Proxmox installed on. Chances are the default option is fine. Click “Next”. Select your location and time zone settings. Then click “Next”.

Pretty easy so far right?
Now you need to set the password and an email. Remember the password you set. We’ll need this in a few steps. You can put in a fake email here if you desire. I used a secondary email I own for this step.
The last step is the network configuration. The defaults it comes up with are likely OK. Change any options as you see fit for your network. My network configuration was:
Management Interface: Default
Hostname (FQDN): pve.tanuki.local
IP Address: 192.168.20.10 (my network is 192.168.20.0/24)
Netmask: 255.255.255.0
Gateway: 192.168.20.1
DNS Server: 192.168.20.1
Your settings will not be the exact same as mine. If you’re brand new, then accept the defaults it suggested and click “Next”. You will now be on a screen that shows a summary of your choices. Click “Install” to confirm and begin the installation.

After the installation finishes it will reboot. After it finishes booting it will present with a black screen with white text asking for a login. Above that login will be white text that reads:
Welcome to the Proxmox Virtual Environment. Please use your web browser to configure this server - connect to:
https://<ip that was set earlier>:8006/
The IP address I set was 192.168.20.10. When I go to https://192.168.20.10:8006/ I am met with a login screen. Hoorah!

Sign in with the user name “root” and the password you configured earlier. You might get a pop up that says you do not have a valid subscription for the server. That’s alright. Click OK and continue on.
Downloading an ISO
Now let’s grab an ISO we will use for our future first VM. Future parts will use Ubuntu 22. Let’s go grab the Ubuntu 22 Server ISO download URL. Visit releases.ubuntu.com/22.04/. Find the server install image and copy the download link.

Now open the Proxmox window and move your mouse to the left side. Drop down “pve” and click “local pve”. Then click on ISO Images.
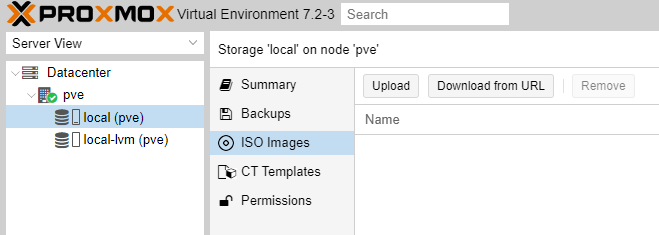
Click the Download from URL button. Paste the URL into the URL box. Click the Query URL button to automatically fill in the file name. Click Download.

A box will open the the Ubuntu Server 22 ISO will start downloading.

Let it finish and exit out.
Now this is pretty freaking cool. Now we have an ISO stored in Proxmox that we can use over and over again to create VMs.
Wrapping Up
That does it for the first part of creating our home lab. Now you have a working Proxmox installation that is running on a small server and available over a web browser within your local network.
Congratulations on taking your first step towards an awesome home lab.
In the following parts we will install a wiki to keep track of our notes, a VPN so we can access the lab from anywhere, and start talking about security concepts. I hope your pumped.
Leave any questions in the comments or DM me on twitter.
Thanks for the article Tanuki!
I'm having an issue logging in through a browser seeing if you can help?
The default IPs it gave me were:
host 192.168.100.2 (/24 subnet)
gateway 192.168.100.1
DNS 127.0.01
Wouldn't let me login from browser saying Unable to connect from multiple browsers.
Changed the DNS to 192.168.100.1 but same issue.
I then changed the gateway+DNS to 192.168.1.1 which is what my personal network is configured as but still same issue (tried changing host IP to 192.168.1.25 so it would be on my network as well but same issue).
The hostname(FQDN) wouldn't have an effect right? I just replaced the default they gave....pve.example.invalid and replaced 'example' and 'invalid'
Anything else you think I should try?
Thanks
Will this absolutely not work for me, since I do not have access to ethernet where I live? It's locked in a closet at the house I live in, we only have access to Wi-Fi. If this won't work, I'm a bit stumped in how to build a home lab at this point. Cuz I've got a shit 2 core windows 10 machine with 8GB ram, but its dual booted with Ubuntu. Wish I had read these posts a little earlier. So there aren't going to be any solutions to Proxmox?