
Building a Home Lab Part 3 - Installing WireGuard
Learn to install WireGuard VPN and use it to access your home lab from anywhere

Today’s home lab guide will show you how to install WireGuard VPN within your home lab and set up a VPN client. A good VPN client machine would be any computer that you take with you remotely, like a laptop.
This will allow you to connect into your home lab from any place that has an internet connection. You protect your communications by using a VPN. You don’t need to worry about malicious people snooping in on your traffic.
Why would you want to connect into your home lab from anywhere in the first place? Well…it depends what you do in your home lab, but here are some of my reasons:
Access my desktop using remote desktop
Sign into my Zoneminder instance to view live camera feed of my property
Access my network attached storage with personal files
Let’s dive right in…
Step 1: Take a Snapshot
The first thing we are going to do is make a backup of our VM. This will let us revert back to a known state in case something messes up during installation. It is easier to revert than setting up a fresh VM again.
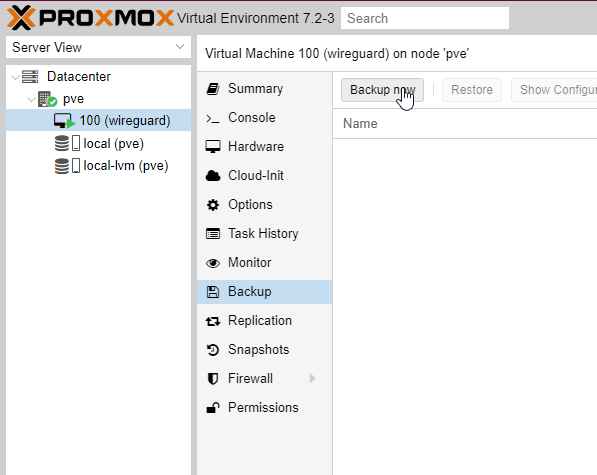
Find the VM you finished setting up from Part 2b. Left click on it. Then click Backup. Click on “Backup now”.
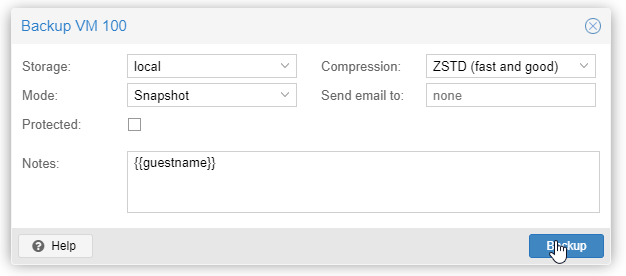
A dialog box will pop up. The defaults are okay. Click “Backup”. This will make a snapshot. Think of the snapshot as a point in time where everything was OK with the VM.
It will take a minute or two to take the snapshot.
Step 2: Install WireGuard on Server
This guide will require you to set up two different endpoints. This step focuses on setting up the WireGuard server.
The server is what your VPN clients are going to connect to.
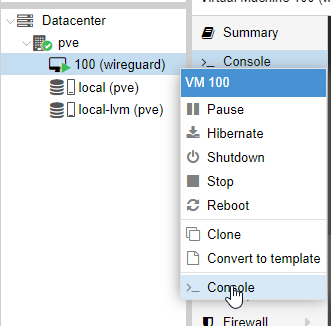
Right click on your VM and select “console”. This will open a new window that just has the VM console in it.
Make sure your VM is fully up to date and then install WireGuard. Run the following commands:
sudo apt update && sudo apt upgrade -y
sudo apt install wireguard
Next we need to generate a key pair using WireGuard commands. WireGuard uses asymmetric encryption to protect communications.
WireGuard will use public keys to encrypt data and a private key to decrypt data. Public keys can be handed out to anyone, but a private key should be kept…well private.

Run the following command to generate a private key and public key for the VPN server. This is all ran on one line. The “|” is found by holding shift and hitting the key that is found right above the ENTER key on a standard US keyboard.:
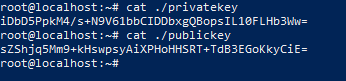
wg genkey | tee privatekey | wg pubkey > publickeyYou are going to need the private key for the configuration file we are about to create. Run this command and take note of the output:
cat ./privatekey
Author’s note: You do not want to give out your private key. I am showing mine for tutorial purposes and will dispose of it once I’m done with this tutorial.
Run the same command for the public key:
cat ./publickeyTake note of the private and public keys and put them in a notepad temporarily. We will be copying and pasting these into configuration files. The server’s public key will be placed in a configuration file we put on our client in a later step.
Create a WireGuard configuration file on the server. This tutorial uses vim to edit files. Use whatever file editor you are most comfortable with.
sudo vim /etc/wireguard/wg0.confFill in the config file:
[Interface]
Address=10.0.0.1/8 # Make sure this private address range is not in use.
SaveConfig=true
PostUp=iptables -A FORWARD -i wg0 -j ACCEPT; iptables -t nat -A POSTROUTING -o <YOUR INTERFACE> -j MASQUERADE;
PostDown=iptables -D FORWARD -i wg0 -j ACCEPT; iptables -t nat -D POSTROUTING -o <YOUR INTERFACE> -j MASQUERADE;
ListenPort=51820 # Standard port for WireGuard
PrivateKey=<SERVER PRIVATE KEY>
Your private key is what we noted down earlier.
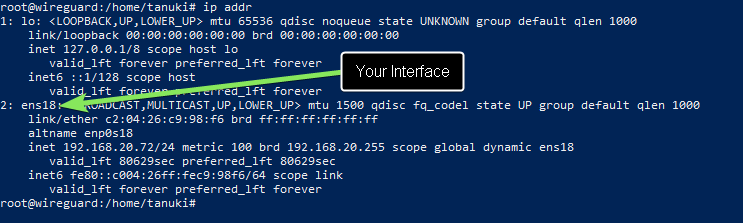
Find your interface by running ip addr in command line:
Here is what my wg0.conf file looks like after it has been filled in:

Let’s discuss the options we just configured:
Address: This is the address that the server will use. Do not use a private IP address range that is already in use on your network. You will encounter routing issues.
PostUp: This line contains commands that will run when the WireGuard interface is brought up. The commands we put here configure iptables to accept all packets on the wg0 interface and masquerades requests with the public IP of our WireGuard server.
PostDown: Removes the rules we added in PostUp when the interface is taken down.
ListenPort: The port WireGuard will accept requests over. 51820 is the default port for WireGuard.
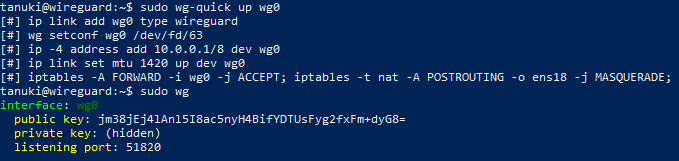
Bring the interface up and check if it works:
sudo wg-quick up wg0
sudo wg
Here is my output after running that last command:
Step 3A: Install WireGuard on a Ubuntu Client
These commands are meant for a client Ubuntu machine. In other words, these commands should be run on an Ubuntu machine that will connect to the VPN.
For Windows steps go to Step 3B.
Begin by making sure the client machine is up to date and has WireGuard installed:
sudo apt update && sudo apt upgrade -y
sudo apt install wireguard
Now create a key pair for the client like we did for the server:
wg genkey | tee privatekey | wg pubkey > publickeyJust like last time we are going to use the cat command to get the key information and note it down somewhere for use within our configuration file.
Create a WireGuard configuration file for the client. Use any text editor you are comfortable with:
sudo vim /etc/wireguard/wg0.confFill in the config file:
[Interface]
Address=10.0.0.11/8
SaveConfig=true
PrivateKey=<YOUR CLIENT PRIVATE KEY>

[Peer]
PublicKey=<PUBLIC KEY FROM SERVER>
AllowedIPs=0.0.0.0/0 # Tell WireGuard to route all traffic through VPN tunnel
Endpoint=<YOUR PUBLIC IP ADDRESS>:51820
PersistentKeepalive=60
Here is what mine looks like after it is all filled out:
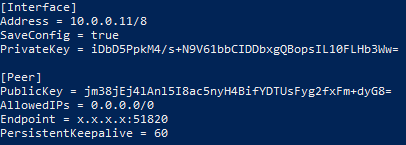
My Endpoint is configured to x.x.x.x. That’s because I did not want to expose my public ip address in this tutorial.
Use your actual public ip address. You can find the public ip address of your home network by going to whatismyipaddress.com.
Bring up the interface:
sudo wg-quick up wg0Proceed to step 4 unless you also want to set up a Windows VPN client.
Step 3B: Install WireGuard on a Windows Client
These commands are meant for a client Windows machine.
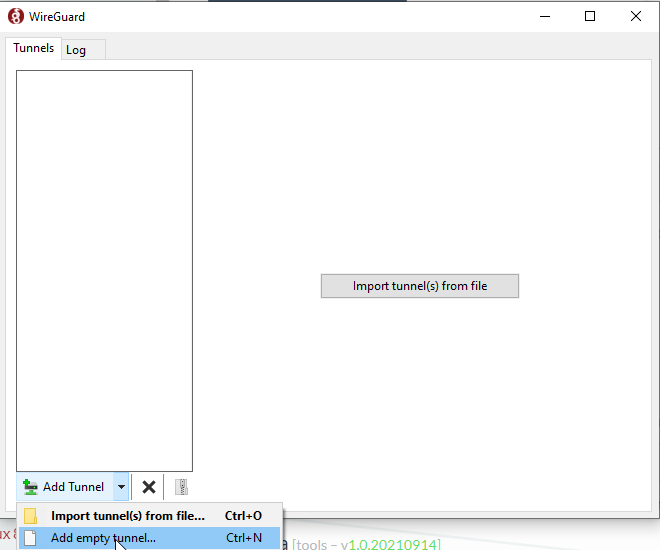
Go to the WireGuard website and download the Windows installer. Install WireGuard by running the installer.
Open WireGuard and add an empty tunnel:
Fill in the configuration file. It should look like this:
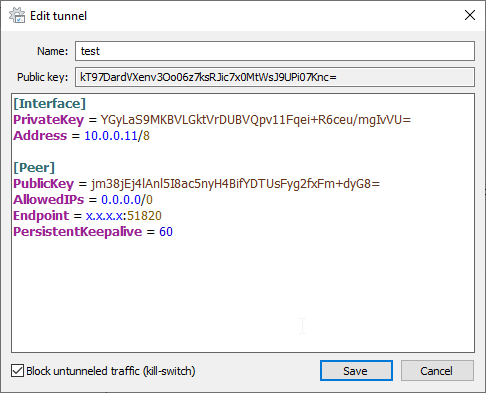
The client public and private key are generated for you. Take note of the client public key. We will use this client public key in step 4.
The client public key in this example is the one starting with kT97Dard… Yours will be different.
Like in step 3A, my Endpoint is configured to x.x.x.x. That’s because I did not want to expose my public ip address in this tutorial.
Go to whatismyipaddress.com to get your public ip address.
Hit save and then click “Activate”.
Step 4: Port Forwarding
If you made it this far then we have our WireGuard server installed and a WireGuard client installed. To fully test our VPN we need to configure a port forward rule and then take our VPN client machine to a different network to test it out.
Each router’s settings is different. I won’t be able to tell you exactly how to port forward, but I can give you an example. Consult your router model’s online manual for figuring out port forwarding.
You can find a YouTube video for many of the common routers that ISPs give you.
Here’s an example of my port forwarding rule:
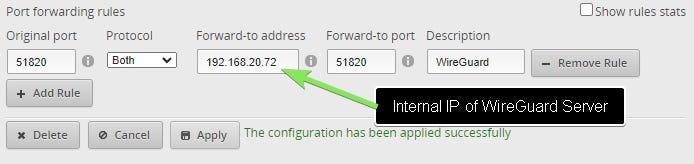
We forward any requests coming to our public IP address on port 51820 to the internal IP address of the WireGuard server on port 51820.
Step 5: Put the Client Public Key on WireGuard Server
Go back to the WireGuard server. Run these two commands:
sudo wg set wg0 peer <client's publickey> allowed-ips 10.0.0.11/8
sudo sysctl -w net.ipv4.ip_forward=1
This is where you could put the sZShjq… public key from 3A or the kT97Dard… public key from step 3B.
The first command adds the peer as a valid client to connect to the VPN. The second command allows our WireGuard server to forward network packets.
Run the following command to make sure everything is set up correctly:
sudo wgYou should receive output that looks like this:
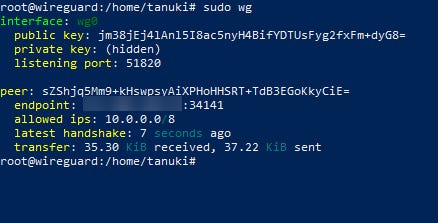
Awesome! We can see that the endpoint has showed up. We also see that our latest handshake was a few seconds ago and that information has been transferred over the tunnel. I had my laptop connected to another network and it connected in.
Woohoo!
As another test I will see if I can ping other machines within my internal LAN from my VPN client while it is on a completely different network:
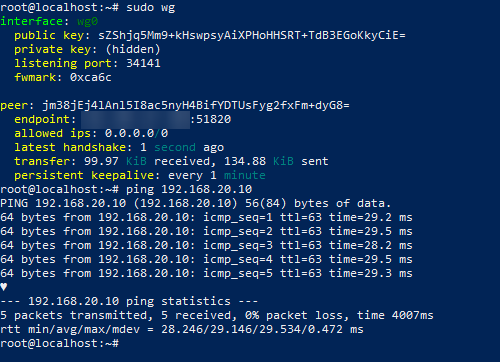
Success!
Summary
With WireGuard added to our home lab we can access our internal resources from anywhere with a valid network connection. WireGuard uses encryption, so our network communications are protected.
Now we can begin adding other services within our home lab and access them when we aren’t even home.
In a near-future issue we will improve our VPN configuration with DDNS. DDNS, or Dynamic DNS, keeps a name server updated with the correct ip address.
This is helpful if your public ip address changes, which happens if you aren’t assigned a static public IP address. That solves the headache of having to change our configuration files every so often.
I hope this was helpful and that you look forward to building out the home lab even more.
Cheers! :^)