
Build a Home Lab Part 4 - Intro to Web Servers
Learn how websites work behind the scenes

This home lab issue is fresh from the presses and will introduce you to web servers.
If you haven’t done any of the home lab issues you can find part 1 here or you can find the previous issue here.
So why would you want to learn about web servers?
I have two reasons right off the bat:
Reason 1: You are likely to support a web application at some point in your IT career. You’ll want to have background information on how a web application works.
“But Tanuki, I’m going to go straight to pentesting! I don’t need to know how to set up a web server and configure it!”
If this is you, then let me guide you toward the light. Please do not go into offensive security if you think you can get away with not learning how things work under the hood. You’ll have a much better time breaking into things if you know how they work.
Reason 2: Many open source applications that you will encounter are web applications. Knowing how web servers work will help you fix issues when docs are scarce. There’s a good chance you’ll encounter open source at some point on the job. You already have during this series cough WireGuard cough.
By the end of this home lab article you will know how to set up Apache2, have a basic understanding of its configs, and be able to change the default web page.
Understanding Web Servers & Web Requests
We’ll begin by understanding how web requests travel to a web server. Before that though let’s begin an installation of an Ubuntu 22 Server VM. That way it can install in the background and be ready for later.
Set up a new virtual machine while you read the remainder of this section. Call it “webserver-01”. The following specs will be enough:
20 GB disk space
1 CPU
2 GB RAM
Review Part 2 and Part 2B if you can’t remember the steps for installing Ubuntu Server:

While the server installation goes let’s learn about web servers. Then we’ll install one ourselves.
Understanding HTTP
When we access websites we do so using HTTP. HTTP stands for the Hypertext Transfer Protocol. When you access a website like Twitter you are using HTTP. Accessing your bank site? HTTP.
Now you may be wondering, “But I see HTTPS in my browser’s address bar? Is that the same?”.
Yes…almost.
HTTPS stands for Hypertext Transfer Protocol Secure. It is an extension of HTTP used for secure communication. We’ll dive deeper into HTTPS in the next home lab issue.
Browsers use HTTP to request files from web servers. When the HTTP request reaches the web server, the server accepts the request. It then finds the requested document and sends it back. This would be the response.
This response is what is displayed in the browser.

This is how all websites on the internet work. You send an HTTP request. The web servers sends a response based on its configuration.
Who can access?
Now consider the following: Since we are setting up a webserver, will people be able to connect to it from anywhere?
If you answered “no”, you would be correct. The webserver we are setting up will be available only within our local area network. You could open it to the outside world if you wanted to using port forwarding though.
Here’s a basic network diagram of what our home lab looks like so far.
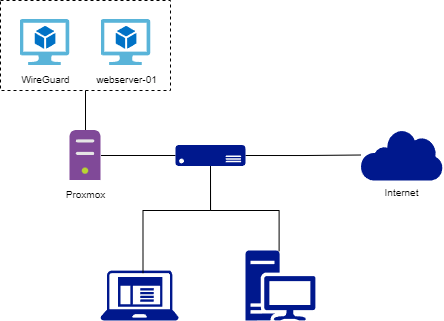
Notice how everything is behind the router (the blue box). We would need to forward port 80 and 443 from the router to webserver-01 if we wanted people outside our LAN to access it.
Why 80 and 443?
Port 80 is the default port for HTTP and port 443 is the default for HTTPS.
What web server will you use?
There are many web servers out there. On Windows Server we have Internet Information Services (ISS). For Linux we have open source options like Apache2 and Nginx.
Today we’re going to learn how to use Apache2. If you ever run into Nginx, don’t panic. At the end of the day all web servers work similarly.
You configure them and then they take a web request and return a response. Once you learn how to handle Apache2, you’ll be able to configure Nginx. The configuration will not be exactly the same, but the knowledge translates.
Let’s get into installing Apache and doing something useful with it…
Step 1: Installing Apache2
Log into webserver-01 once the installation is done and it has been rebooted. Update the packages on the VM:
sudo apt update && sudo apt upgrade -yNow install apache2:
sudo apt install apache2Easy right?
Now run ip addr and note your ip address:
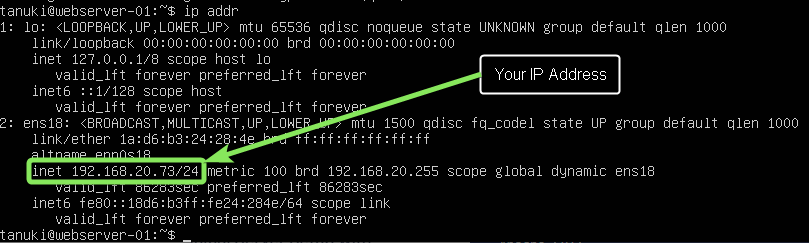
Mine is 192.168.20.73. I’m going to take that and plug it into the address bar of my browser:

You are successful in your installation if you see this page in your browser:
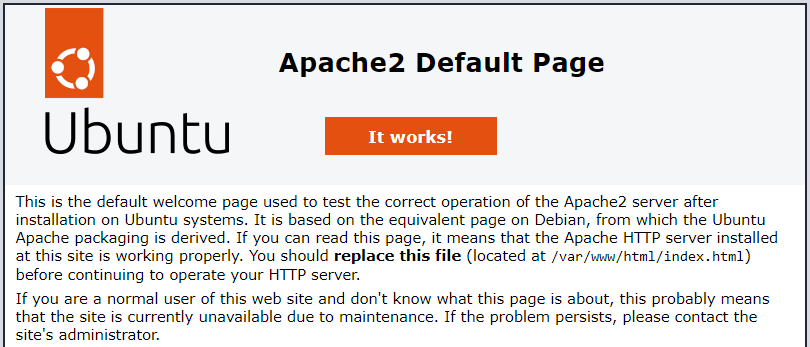
So what happened here?
We sent an HTTP request to our webserver that was located at 192.168.20.73. The webserver returned a response based on its default configuration. The response was the Apache2 Default Page.
Step 2: Finding the Configuration
The default configuration for Apache2 is found in /etc/apache2. Run cd /etc/apache2 to navigate to the directory. Then run ls -la to list everything in Apache2’s folder:
cd /etc/apache2
ls -la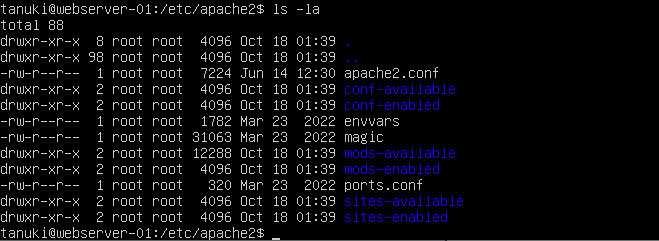
Let’s run through each of these files and directories:
apache2.conf: The main configuration files for apache2.
conf-available: Holds configuration files not tied to a specific module.
conf-enabled: Enabled configuration files not tied to a specific apache2 module. Uses soft links back to conf-available.
envvars: Apache environmental variables.
magic: Text file that contains instructions for figuring out MIME type based on the first few bytes of a file. MIME type is also know as media type. It has the format type/subtype (text/plain, text/html, text/javascript, image/png, image/jpeg)
mods-available: Contains config files to load and configure Apache modules.
modes-enabled: Enabled config files for Apache modules. Uses soft links back to mods-available.
ports.conf: Used to tell Apache what ports to listen on.
sites-available: Has configuration files for virtual hosts. Virtual hosts allow apache to several websites with separate configs.
sites-enabled: Enabled virtual hosts. Uses soft links back to sites-available.
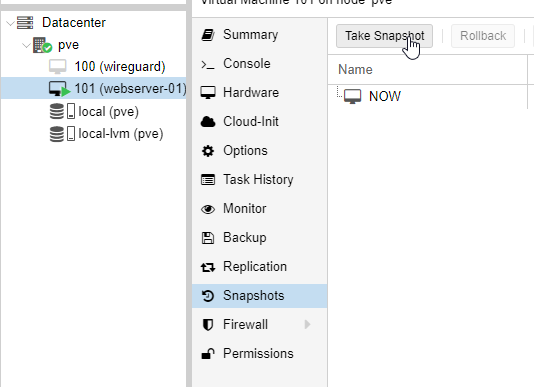
I encourage you to explore each of these directories. Use the cd command to navigate in the different folders. Use the ls -la command to list out the files. Finally, use nano or vim to open the files. Read what’s inside.
Scared you’ll mess something up? No need. Take a snapshot of the VM before you do anything. Then if you mess up you can revert to the snapshot.
Step 3: Display our own HTML
Let’s make this web server do something for us. Let’s display our own text. Before we do that we must figure out how Apache is configured.
Browse to the sites-enabled directory and open the only file there. It will be called 000-default.conf
cd /etc/apache2/sites-enabled
vim 000-default.conf
We are met with a Virtual Host configuration for port 80:
<VirtualHost *:80>
        # The ServerName directive sets the request scheme, hostname and port that
        # the server uses to identify itself. This is used when creating
        # redirection URLs. In the context of virtual hosts, the ServerName
        # specifies what hostname must appear in the request's Host: header to
        # match this virtual host. For the default virtual host (this file) this
        # value is not decisive as it is used as a last resort host regardless.
        # However, you must set it for any further virtual host explicitly.
        #ServerName www.example.com

        ServerAdmin webmaster@localhost
        DocumentRoot /var/www/html

        # Available loglevels: trace8, ..., trace1, debug, info, notice, warn,
        # error, crit, alert, emerg.
        # It is also possible to configure the loglevel for particular
        # modules, e.g.
        #LogLevel info ssl:warn

        ErrorLog ${APACHE_LOG_DIR}/error.log
        CustomLog ${APACHE_LOG_DIR}/access.log combined

        # For most configuration files from conf-available/, which are
        # enabled or disabled at a global level, it is possible to
        # include a line for only one particular virtual host. For example the
        # following line enables the CGI configuration for this host only
        # after it has been globally disabled with "a2disconf".
        #Include conf-available/serve-cgi-bin.conf
</VirtualHost>
We see lots of comments in this file. Those are the lines starting with a hashtag. We see four directives here: ServerAdmin, DocumentRoot, ErrorLog, and CustomLog.
DocumentRoot looks the most interesting out of the four. It is configured with the value /var/www/html. I wonder what would be in that directory if we browsed to it?
cd /var/www/html
ls -la
Huh…we see an index.html. Let’s open it and see what’s inside. Scroll down and investigate some. It should begin to ring a bell. Scroll down far enough and you’ll see this text:
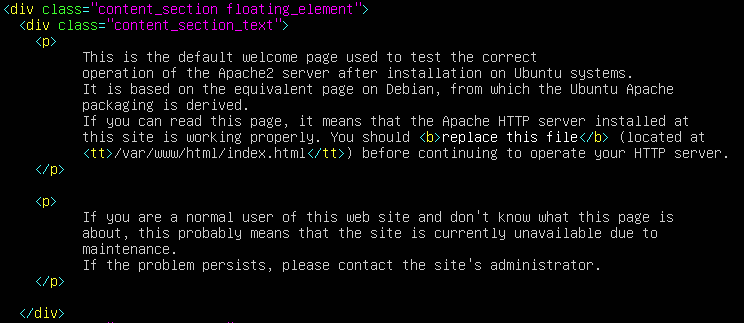
It’s the Apache2 Default Page! Ah ha!
We figured out where the files are stored. What Apache does is it starts in its DocumentRoot, which was configured to /var/www/html, and looks for the file that was requested. Since we didn’t request a specific file it served us the index.html file.
Apache will look for a file starting with index by default if a file isn’t requested.
Let’s make the index file display our own text. Go back to the /var/www/html directory and run the following commands:
sudo mv index.html index.old.html
sudo touch index.html
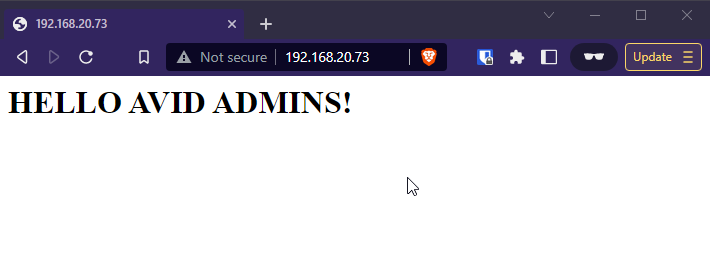
sudo vim index.htmlPut in your own custom HTML. I kept mine simple:
<h1>HELLO AVID ADMINS</h1>Save the file and visit the ip address from earlier. The web page will display your HTML…
Great!
Step 4: Request a Different File
We know that our Apache webserver is looking into /var/www/html folder for files. Let’s create an about page and then request it from the web server.
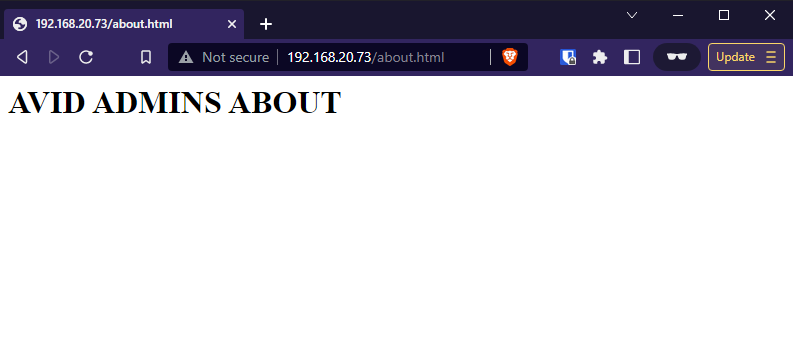
sudo vim /var/www/html/about.htmlEdit the HTML so you know its the about page:
<h1>AVID ADMINS ABOUT</h1>Save the file about.html file.
Now how do we request the about page from the webserver?
Turns out its super easy. We just edit our URL. Type in <your ip address>/about.html. Example:
You request what what you want from the webserver by changing the URL. You likely already knew this without realizing it. Whenever you go to a new web page the URL changes. That URL is used by the browser to send a request to the web server.
Step 5: A note on URLs and Frameworks
We learned that we use URLs to request different items from the Apache webserver. For the about page we explicitly said we wanted the about.html file. So how do other websites and web applications work?
Take a look at Substack’s URLs for example. You don’t see anything ending in something like “post.html”. Instead the URL looks like this:
avidadmin.substack.com/p/title-slug-here
Where’s the file we’re requesting at? There’s nothing ending in .html.
Websites with these kinds of URLs are usually using a web framework. All requests must go through an index file that is configured in the Apache web server. From there, code looks at the URL to determine what information to show the user.
The idea is still the same though:
The webserver is configured to respond to requests by always serving a configured index file. The code handles the rest.
There is no magic or black box. This is something that confused me early on.
Summary
Congrats if you made it to the end. Well done.
You got a solid introduction to webservers and HTTP. You then learned how to install Apache2. From there you figured out where it serves files from and served your own files.
In the next issue we will explore Apache some more. Next time we will learn how to configure our web server to use HTTPS. We’ll do this by using certificates. Hope your ready to learn the basics of public key cryptography!
See you all in the next one.